Legacy Version
This section documents the legacy version of the widget. It is no longer supported, and we strongly suggest you use the new, supported version instead!
If you still want to use the older version, you will find its documentation bellow!
You can see it embedded in this documentation below (this is actually the widget, not just an image).
The widget shows a thumbnail of the most relevant transformation map for the content you want to show alongside it. It is designed to be embedded either within the content itself or in a side bar.
The widget and the transformation map will automatically adjust to the user's language and we currently support English, Portuguese, Japanese, Spanish, Chinese (simplified), Arabic and French. Where the user's locale is set to a different language, the widget will default to English.
When the user clicks on the widget, they will be taken to the corresponding transformation map on the Strategic Intelligence website. Please note that we will pass UTM campaign parameters to the Strategic Intelligence website for our own analytics purposes. These include your website's domain name, your API key and the page on your website on which the widget was embedded.
The widget works best when displayed alongside content about which the user would like to understand the broader context. For example, have a look at this article on the World Economic Forum's website which discusses Gender Parity. You can see the widget in the left hand panel which allows users to find out more on the topic.
Obtaining an API key
Before you can use the widget, you'll need to apply for an API key which you will pass as a parameter when you instantiate the widget. Please do not try to copy the API key we use for example purposes on this website. It will not function correctly for your website. Instead, use the form below to request an API key in order to identify yourself. We aim to reply within 24 hours but typically you will hear from us much sooner. Please carefully note the application criteria before applying for a key:
- Your website must run securely using HTTPS with a valid certificate
- Your website must not be a conceptual prototype or be partially complete
- Your website must not spam or aim to mislead users
- Please try to submit your key request from an email address with the same domain name as the website where you intend to host the widget, wherever possible
- Please note there may be a delay whilst we vet your submission prior to processing your API key
When entering your website URL, please feel free to use wildcards or comma separate different properties. For example, *.mysite.org or this.mysite.org, that.mysite.org or even live.mysite.org, staging.mysite.org, production.mysite.org. We will also automatically whitelist localhost to allow traffic from local development environments, so there is no need to add that explicitly.
Once you receive an API key from us, you will pass it to the widget as a parameter, as explained on our Configuration page.
Installation
We use the newer, and more secure webcomponents technology for the widget and have included some basic instructions on how to use this below. However, we recognise that many platforms such as WIX.com and Wordpress tend to offer the option to embed via an iframe. If you would like further information on how to embed the widget as an iframe, please see our dedicated page.
For webcomponents users/developers, you can follow these instructions to get started.
- Include script tag linking to the widget in the header of your website:
<head>
   <script
      type="text/javascript"
      src="https://cdn.intelligence.weforum.org/latest.js"
    ></script>
</head>
- Add web component to your page
<intelligence-widget apikey="my-api-key" text="text" language="en" />
Notes
- The widget will expand to fill its container, allowing full control on the part of the developer. That said, we recommend using a container width of around 350-400px and a minimum of 300px. For example:
<style>
  .my-container {
      width: 400px;
    }
</style>

<div class="my-container">
  <intelligence-widget apikey="my-api-key" text="text" language="en" />
</div>
- The widget supports the changing of background colour through the use of an enclosing div tag and css. For example:
<style>
  .my-container {
      width: 400px;
      background-color: lightgray;
    }
</style>

<div class="my-container">
  <intelligence-widget apikey="my-api-key" text="text" language="en" />
</div>
Guidelines
- If you intend to wrap the widget with a heading of some kind which refers to the World Economic Forum, we would kindly appreciate it if you could refer to us as "World Economic Forum" rather than "WEF". In general, there is no need though as the widget itself includes the World Economic Forum's logo to identify the source.
- We recommend placement of the widget in a sidebar, alongside some content on the same topic, so that users can use the widget to learn more on the topic should they wish.
- To provide adequate contrast against the background colour of your website, you may need to use the
--textColoroption described on our styling page. We kindly ask you don't do anything too radical with this - stick to black, grey or white if possible.
Configuration
The following parameters are accepted by the widget.
| Argument | Description | Note |
|---|---|---|
apikey | API key to authenticate your website. | Required. See our Getting Started page for details on how to get one. Note: please do not try to copy the API key we use for example purposes on this website. It will not function correctly for your website. |
topicid | ID of a topic. | One of topicid, text, or link is required. If topicid is passed, the transformation map correpsonding to that topic will be displayed. The topicid can be found for any given topic by examining the URL at https://intelligence.weforum.org and you will find they correspond to the following format: https://intelligence.weforum.org/topics/topicID, for example https://intelligence.weforum.org/topics/a1Gb00000015HiiEAE. In this example, a1Gb00000015HiiEAE is the topicid and hence can be passed as a parameter to the widget as follows: topicid = "a1Gb00000015HiiEAE" |
link | Hyperlink to an article to analyse. | One of topicid, text, or link is required. If link is passed, the widget will attempt to map the article at the end of the link to the most appropriate topic and display the appropriate transformation map. For example: link = "https://www.bbc.co.uk/news/world-asia-china-51217455". Please note that your website must not be behind a paywall or authentication for this option to work correctly, as we will attempt to web scrape the page and analyse it in order to determine the most appropriate topic. |
text | Text to analyze and match to a topic. | One of topicid, text, or link is required. If text is passed, you can supply one or more words and we will attempt to automatically determine the most relevant transformation map for your content. For example: text = "China coronavirus: Wuhan and Huanggang on lockdown" |
language | Content will return in this language if supported, otherwise english. | If not provided language will be taken from browser. For example: en-US. This should be a valid value for the Accept-Language header standard. For further details see https://developer.mozilla.org/en-US/docs/Web/HTTP/Headers/Accept-Language. We currently support English, Portuguese, Japanese, Spanish, Chinese (simplified), Arabic and French as languages. |
layout | Enables the widget to take various different forms. | Optional. Set layout="default" or layout="wide" as appropriate. The default layout is designed for placement in a side bar alongside an article. The wide layout is designed for placement in the article body itself, though the default also suits that placement as well. You may like to experiement with both to see which looks best for your setting. The wide widget makes use of the additional real estate to include a brief summary of the topic as well as the map. |
openinnewwindow | Specifies window opening behaviour. | Optional. Set openinnewwindow="true" or openinnewwindow="false" as appropriate. Setting to true will make the widget open the Strategic Intelligence website in a new window rather than in the current frame. Setting to false will open it in the current frame. Default behaviour is to open in the current frame. |
Style
Overview
We offer some limited options for customising the style of the widget.
| Argument | Description | Note |
|---|---|---|
--textColor: | HTML compliant colour code/name | Optional. |
--thumbnailRadius: | Allows for rounding of the corners of the thumbnail image of the topic | Optional. Use px or % as you would in CSS |
--fontFamily: | Allows you to modify the fonts to suit your website | Optional. Use as you would in standard CSS, for example --fontFamily: Biotif, sans-serif; |
Example usage
<html>
  <head>
    <script
      type="text/javascript"
      src="https://cdn.intelligence.weforum.org/latest.js"
    ></script>
    <style>
      intelligence-widget {
        --textColor: darkGrey;
        --thumbnailRadius: 5px;
        --fontFamily: Biotif, sans-serif;
      }
    </style>
  </head>

  <intelligence-widget apikey="my-api-key" text="text" language="en" />
</html>
Browser support
Overview
The widget currently covers approximately 87% of browsers in use today and you can see the list here.
In the event that a user browsing your website uses a different browser, the widget will simply emit no HTML, and hence you should plan to handle this scenario gracefully.
The widget automatically includes the necessary polyfills to support the above in its bundle.
Things to watch
The Strategic Intelligence website itself no longer supports Internet Explorer 11, however we recognise the need for the widget to support this product as your userbase demographics may be different. As such, Internet Explorer 11 users will be able to view the widget, but on clicking it, they will be given our unsupported browser page which contains links to download a more recent product.
The widget occasionally emits minimal logging in to the browser's console log under three scenarios:
- When an invalid API key was used
- When a topic could not be matched given the parameters provided
- When the widget was unable to contact the server for some reason
Detailed example
Here's how it all looks when you put it together:
<!DOCTYPE html>
<html lang="en">
  <head>
    <meta charset="utf-8" />
    <meta
      name="viewport"
      content="width=device-width, initial-scale=1, shrink-to-fit=no"
    />
    <script
      type="text/javascript"
      src="https://cdn.intelligence.weforum.org/latest.js"
    ></script>
    <style>
      intelligence-widget {
        --textColor: darkGrey;
        --thumbnailRadius: 5px;
        --fontFamily: Biotif, sans-serif;
      }
    </style>
  </head>

  <body>
    <intelligence-widget
      apikey="my-api-key"
      topicid="my-topic-id"
      language="en"
    >
    </intelligence-widget>
  </body>
</html>
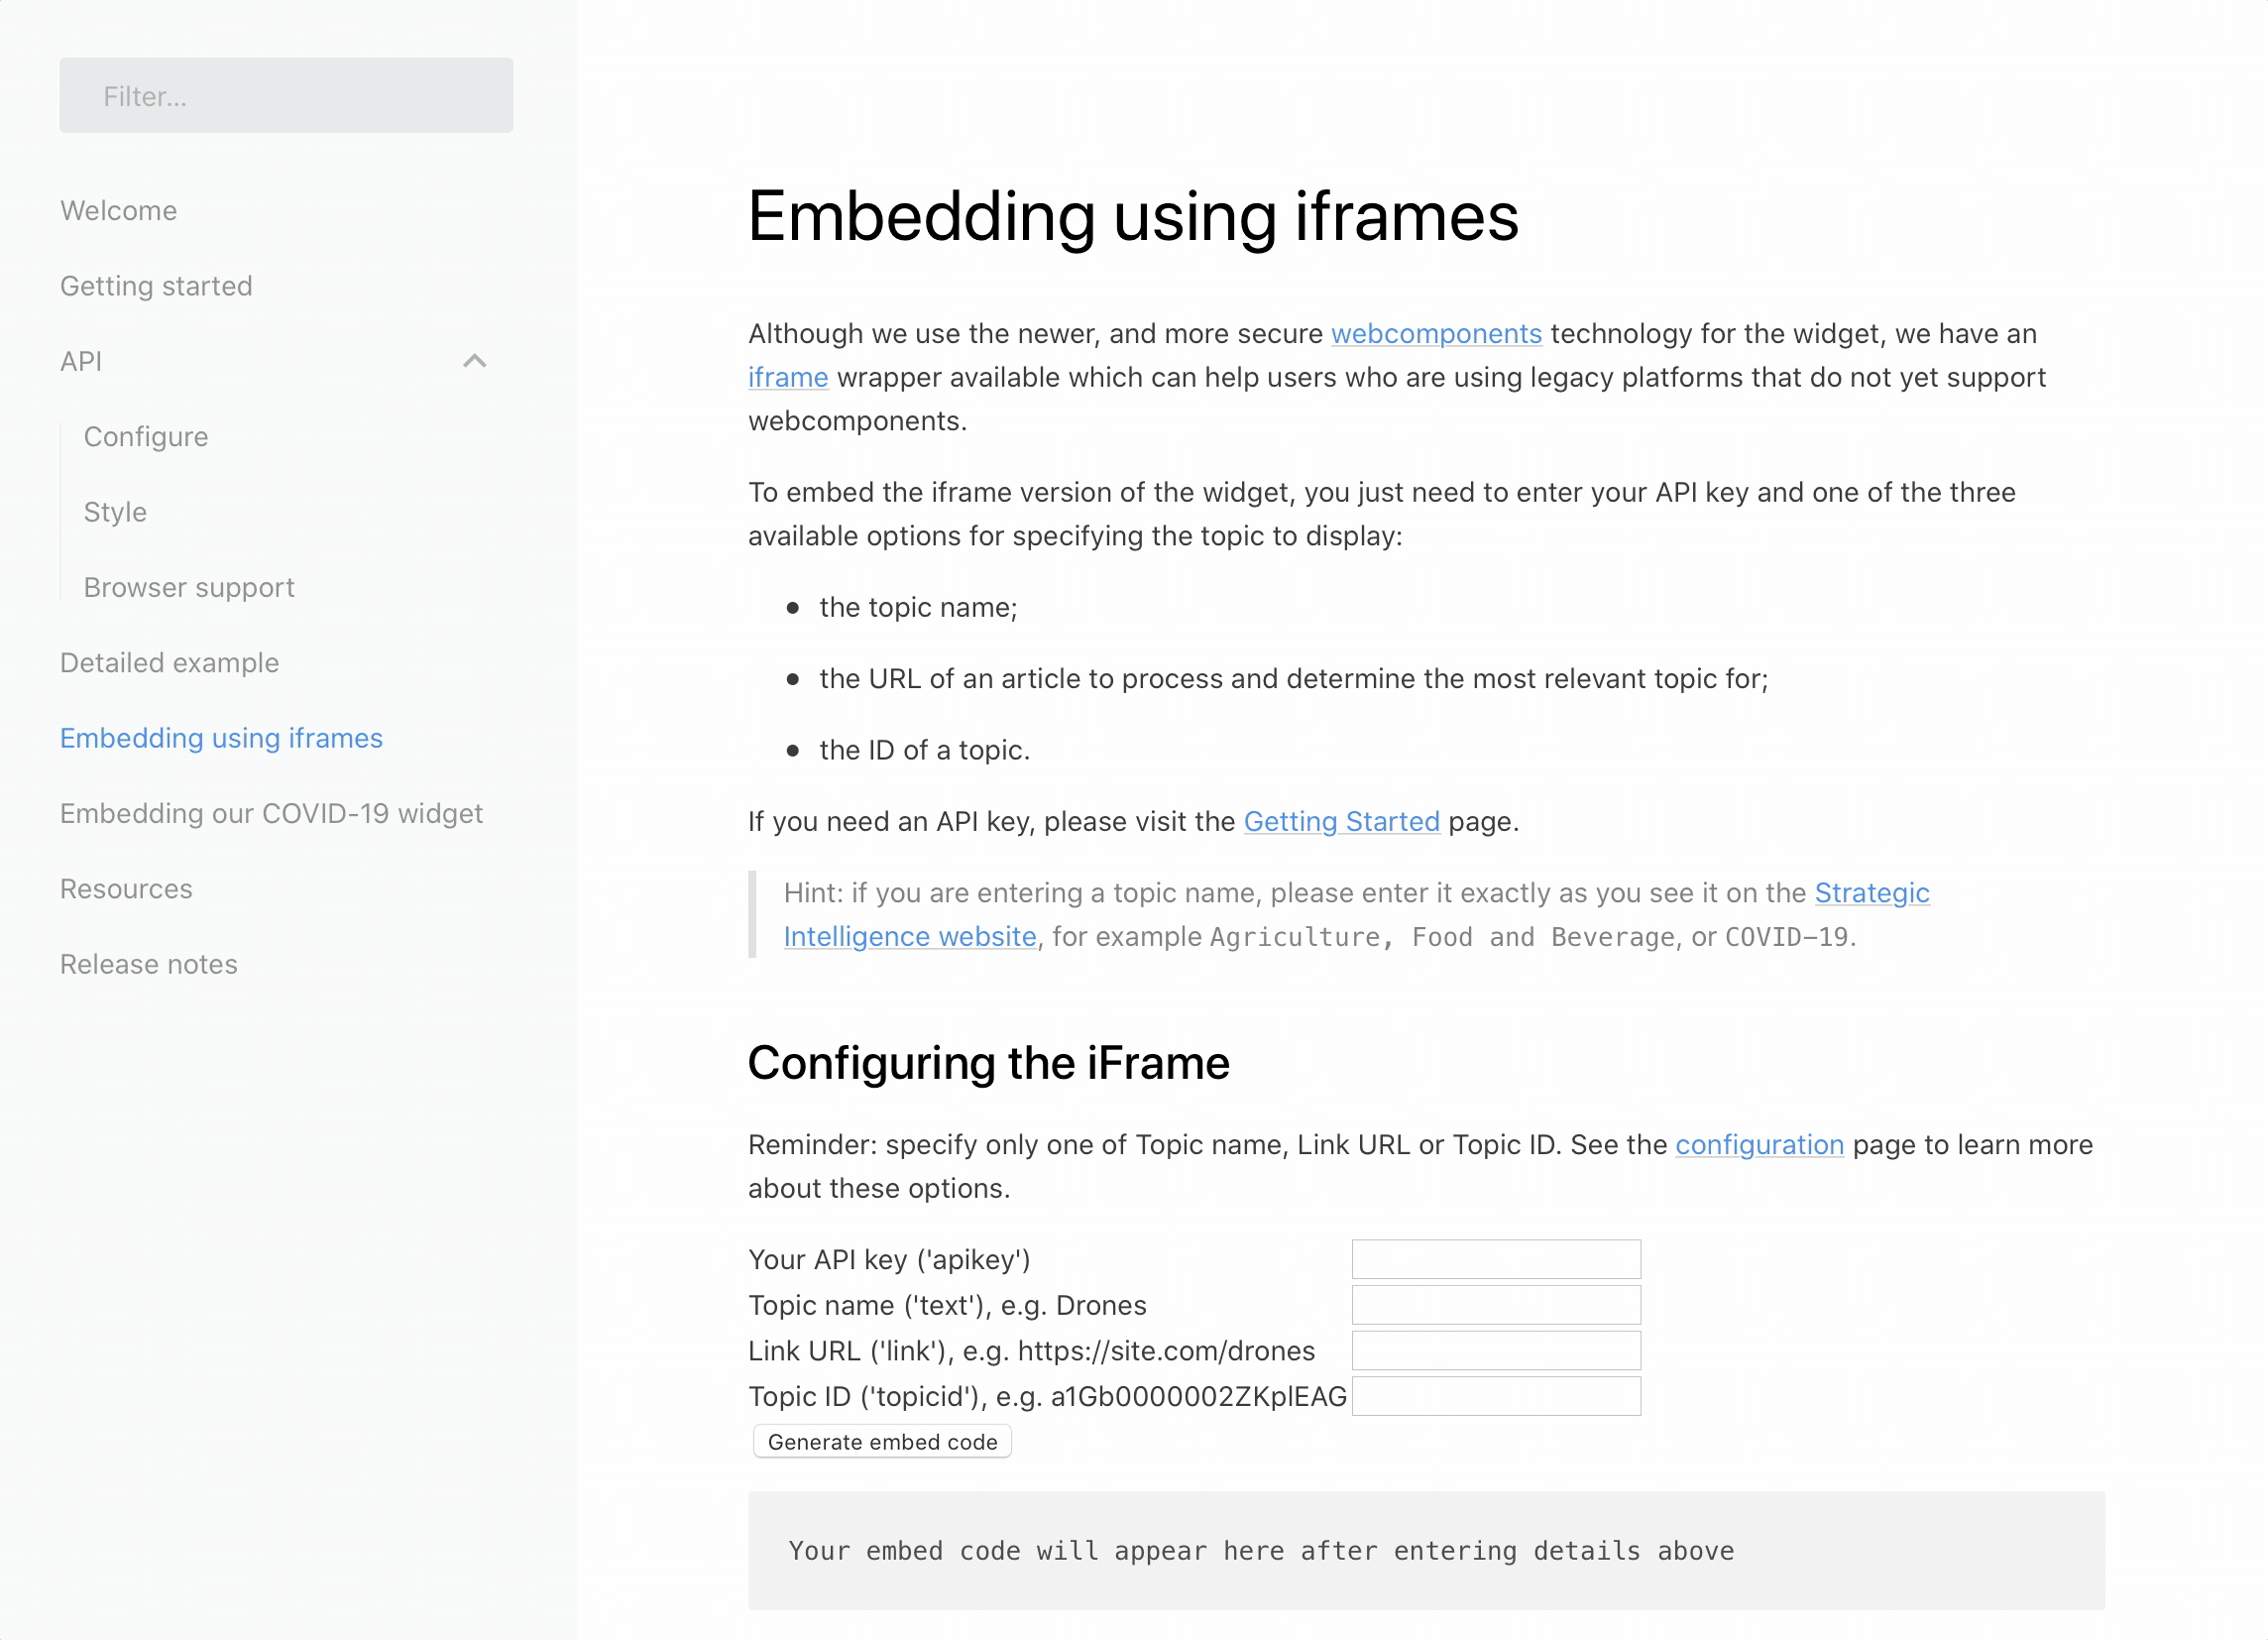
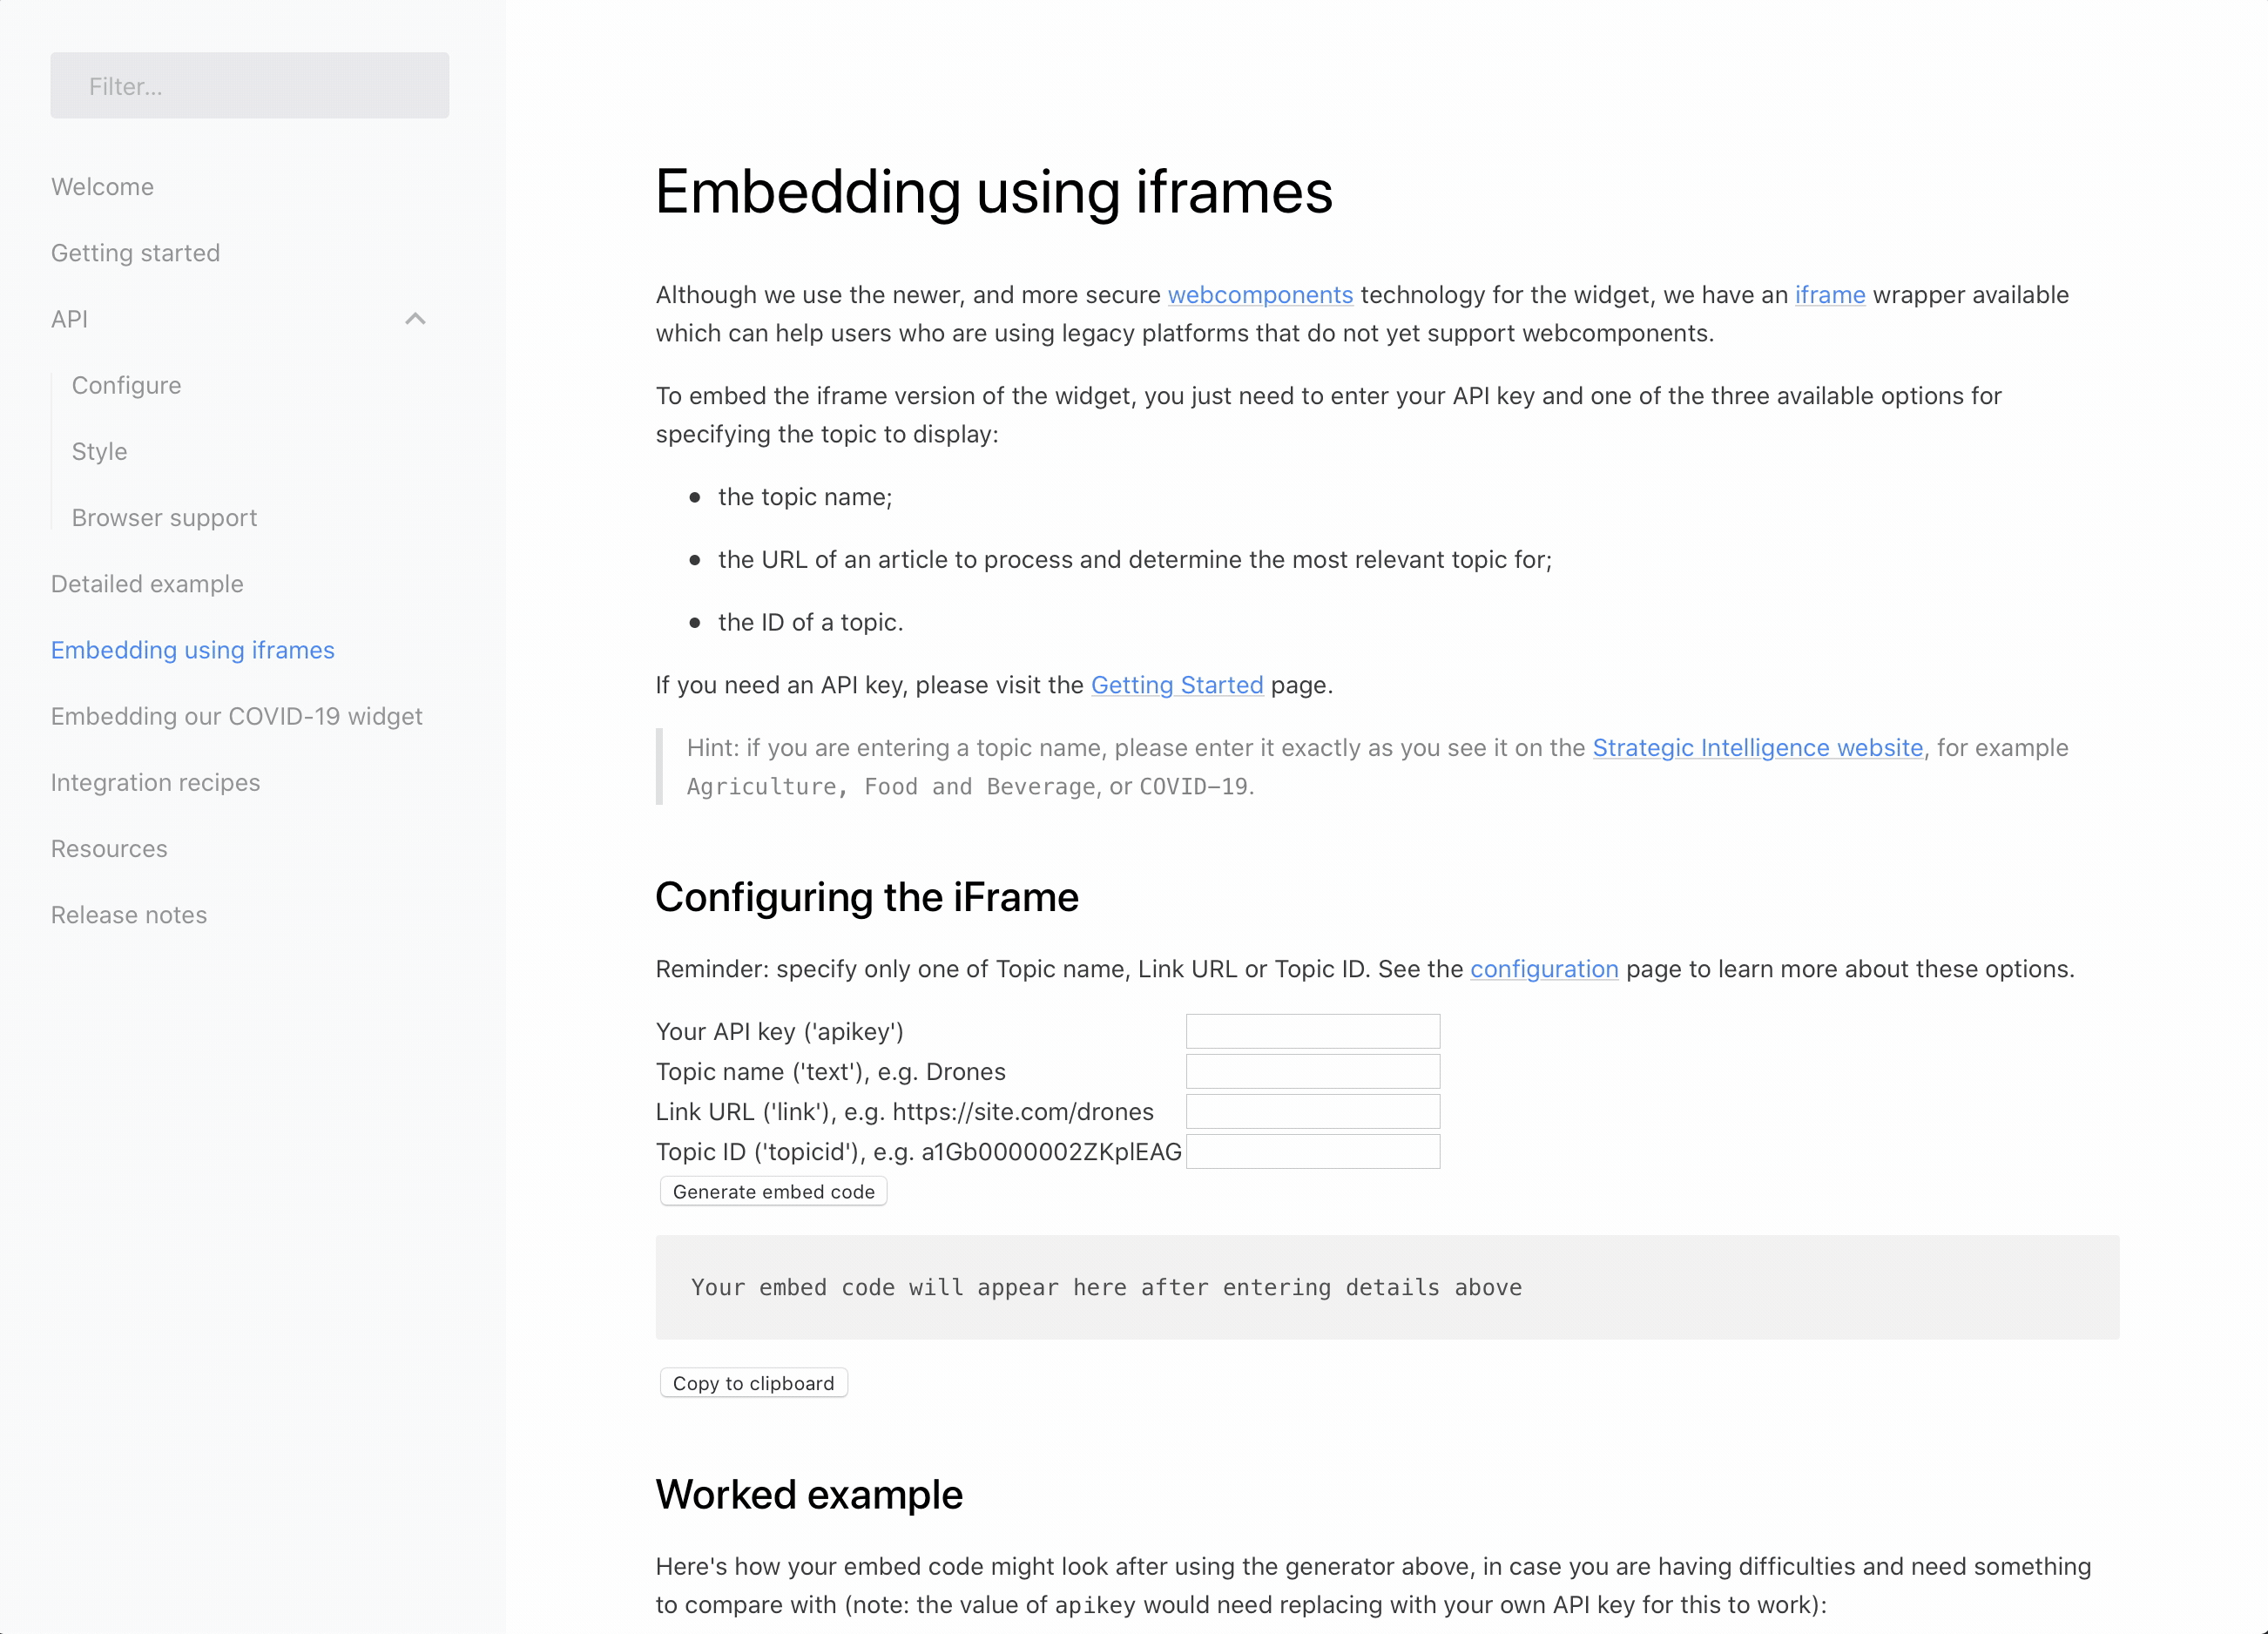
Embedding using iframes
Although we use the newer, and more secure webcomponents technology for the widget, we have an iframe wrapper available which can help users who are using legacy platforms that do not yet support webcomponents. You can see how the iframed widget looks below (this is actually an iframe, not just an image):
To embed the iframe version of the widget, you just need to enter your API key and one of the three available options for specifying the topic to display:
- the topic name;
- the URL of an article to process and determine the most relevant topic for;
- the ID of a topic.
If you need an API key, please visit the Getting Started page.
Hint: if you are entering a topic name, please enter it exactly as you see it on the Strategic Intelligence website, for example
Agriculture, Food and Beverage, orCOVID-19.
Configuring the iFrame
Reminder: specify only one of Topic name, Link URL or Topic ID. See the configuration page to learn more about these options.
Worked example
Here's how your embed code might look after using the generator above, in case you are having difficulties and need something to compare with (note: the value of apikey would need replacing with your own API key for this to work):
<iframe
  src="https://cdn.intelligence.weforum.org/iframe.html?topicid=a1Gb00000015MIVEA2&apikey=my-api-key&openinnewwindow=true"
  style="border:0px solid white;"
  name="intelligenceWidgetIframe"
  scrolling="no"
  frameborder="0px"
  marginheight="0px"
  marginwidth="0px"
  height="300px"
  width="300px"
></iframe>
Note: you can adjust the
heightandwidthparameters to suit your website. Some website builders like wix.com let you do this by dragging the frame, others may need you to adjust those parameters to fit the widget nicely within your website's layout.
Advanced usage
You can use all of the configuration options documented on the configure page, but rather than setting them as attributes of a webcomponent, you can pass them as query parameters in the source url of the iframe. For example:
<intelligence-widget apikey="my-api-key" link="http://my.website.url"></intelligence-widget>
becomes:
<iframe src="https://cdn.intelligence.weforum.org/iframe.html?apikey=my-api-key&link=http://my.website.url">
...
</iframe>
The widget also supports the styling parameters which are documented on the styling page. To use these, again, just pass them as query parameters in the source url of the iframe but remove the preceding "--" and substitute the colon (:) for an equals sign (=). So for example:
<style>
  intelligence-widget {
    --textColor: darkGrey;
    --thumbnailRadius: 5px;
    --fontFamily: Biotif, sans-serif;
    }
</style>
becomes:
<iframe src="https://cdn.intelligence.weforum.org/iframe.html?apikey=my-api-key&link=http://my.website.url&textcolor=darkGrey&thumbnailradius=5px&fontfamily=Biotif, sans-serif">
...
</iframe>
Guidelines
- If you intend to wrap the widget with a heading of some kind which refers to the World Economic Forum, we would kindly appreciate it if you could refer to us as "World Economic Forum" rather than "WEF". In general, there is no need though as the widget itself includes the World Economic Forum's logo to identify the source.
- We recommend placement of the widget in a sidebar, alongside some content on the same topic, so that users can use the widget to learn more on the topic should they wish.
- To provide adequate contrast against the background colour of your website, you may need to use the
textColoroption described on our styling page. We kindly ask you don't do anything too radical with this - stick to black, grey or white if possible.
Integrating with WIX.com
Tutorial
WIX is a popular service which helps non-technical users build a website. You can integrate the widget into your WIX.com site using either the webcomponents approach or iframe approach, but the latter is easier and does not need you to enable "dev mode".
- To get started, you must firstly have applied for and received an API key from us. You can do that here.
- Follow the instructions and use our generator to build the embed code for an iframe. You can find that here. Copy the embed code to the clipboard.
- In your WIX.com site editor, edit your site and use the "Add" functionality (represented with a "plus" symbol) to add an "HTML iframe" component. You can find it on the selection of components under the "more" grouping.
- Click the "Enter code" button that appears just above the iframe window WIX has added to your website.
- Copy and paste your embed code you generated using this documentation in to the box which says "Add your code here".
- Close the modal.
- You should now see the widget appearing in your website. You can move it to wherever is most appropriate on your website.
- If you would like to make the widget bigger, click "Edit Code" above it and try changing the default width and height parameters in the code from "300px" to "100%". You should find that resizing the iframe window then enables you to make the widget smaller or larger.
Watch how it's done
We've provided a quick visual overview of how you do this below.
Integrating with Wordpress blogs
Tutorial
Wordpress is a popular blogging service. You can integrate the widget into your Wordpress site using the iframe approach.
- To get started, you must firstly have applied for and received an API key from us. You can do that here.
- Follow the instructions and use our generator to build the embed code for an iframe. You can find that here. Copy the embed code to the clipboard.
- In blog entry add a block (represented with a "plus" symbol) of type "Custom HTML". You can find it easily by searching for "HTML".
- Click the "HTML Code" tab and copy and paste in the embed code you copied to the clipboard.
- Click Update to save your post.
- Click Preview to preview your post.
- You should now see the widget appearing in your website.
Watch how it's done
We've provided a quick visual overview of how you do this below.
Looking for information on becoming a Digital Member of the World Economic Forum? Learn more about how you can monitor the topics which interest you the most, create and embed customised transformation maps and participate in World Economic Forum virtual events by clicking here.
Displaying your custom map created with your Digital Membership Pro
Tutorial
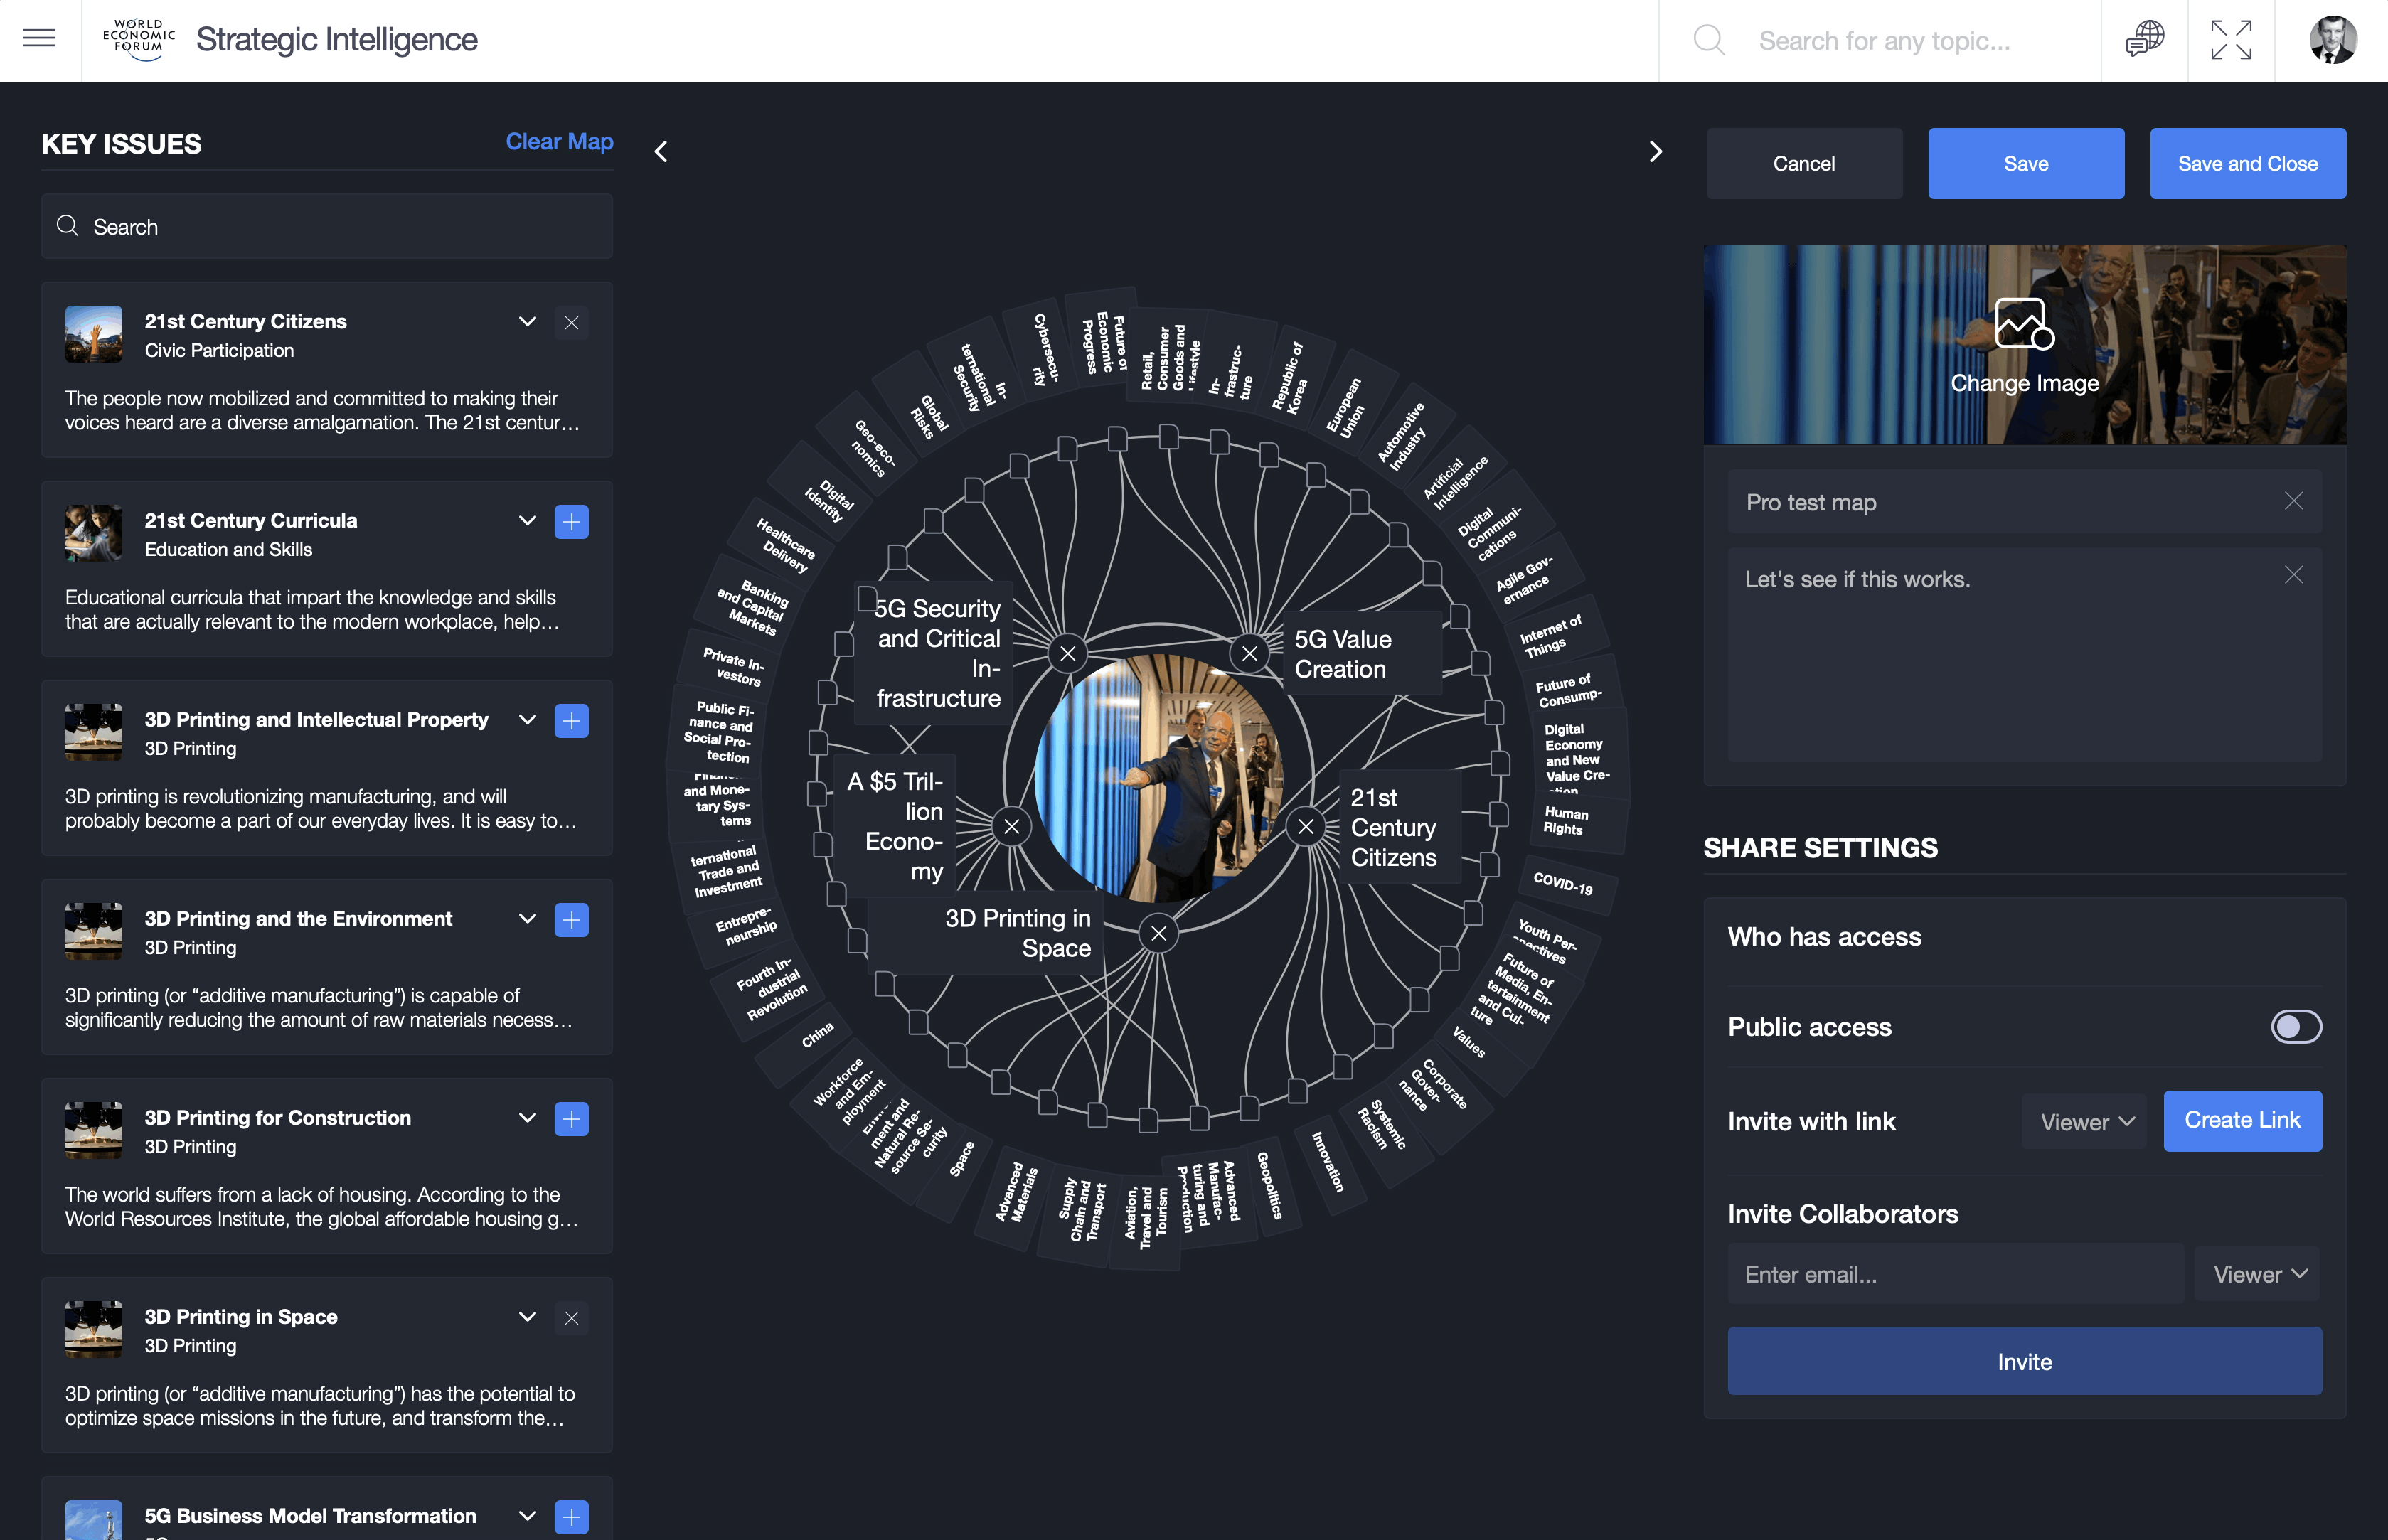
If you become a Digital Member Pro by joining via our Digital Member's Portal you can create your own customised maps and then surface them on your website or intranet using the widget. Please note that this feature is not available with Digital Membership or Public access. Here's a summary of how to do it:
- When editing your custom map using Strategic Intelligence you need to set Public access to
ON. You can do this using the toggle switch in the bottom right hand corner when editing a custom map. - Use the button displayed to copy the Public Access URL.
- From your Public Access URL, extract the map ID. For example, if the URL is
https://intelligence.weforum.org/topics/6502ddc3770c4d999e45b8b9df450696then the map ID is"6502ddc3770c4d999e45b8b9df450696". It's the mixture of numbers and letters after/topics. - Follow the instructions for setting up the widget. You can start with the Getting Started page and use either the webcomponents or iFrame implementation.
- As description on the Configuration page, set the
topicidparameter equal to that of your map ID. For example,topicid="6502ddc3770c4d999e45b8b9df450696". You'll need to set theapiKeyparameter as usual. - With that, you should be all set and when you load the widget, you should see your own custom map displayed.
Watch how it's done
We've provided a quick visual overview of how to enable Public Access and copy the URL in the video below. Please note you must have Digital Membership Pro to see these settings.